Modular pipes with FitOnLine
This guide builds a modular pipe SmartProp in  Counter-Strike 2 using
 FitOnLine, BendDeformer, CreateSizer, CreateRotator, and nested SmartProps.

📦 Download Pipe Mesh Kit (pipe_meshes.zip) 📦 Download Finished guide_fitonline.vsmart
This guide builds on the fundamentals in the SmartProps guide. Start there when working with SmartProps for the first time.
Mesh requirements and preparation
Before building a procedural pipe system, the source 3D meshes must be prepared according to specific guidelines:
-
Pivot Placement: Place the origin pivot at the start or end border of the mesh along the connection axis, such as Z or Y.
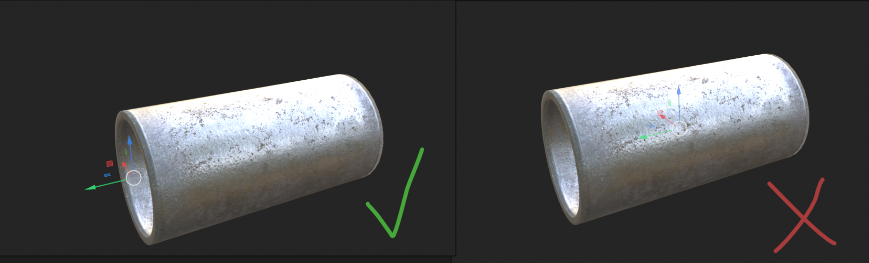
-
Subdivision Density for Bending: Straight pipe sections only need a few longitudinal segments. Meshes intended for curvature or deformation require extra edge loops along their length so they deform smoothly when passed through
BendDeformer.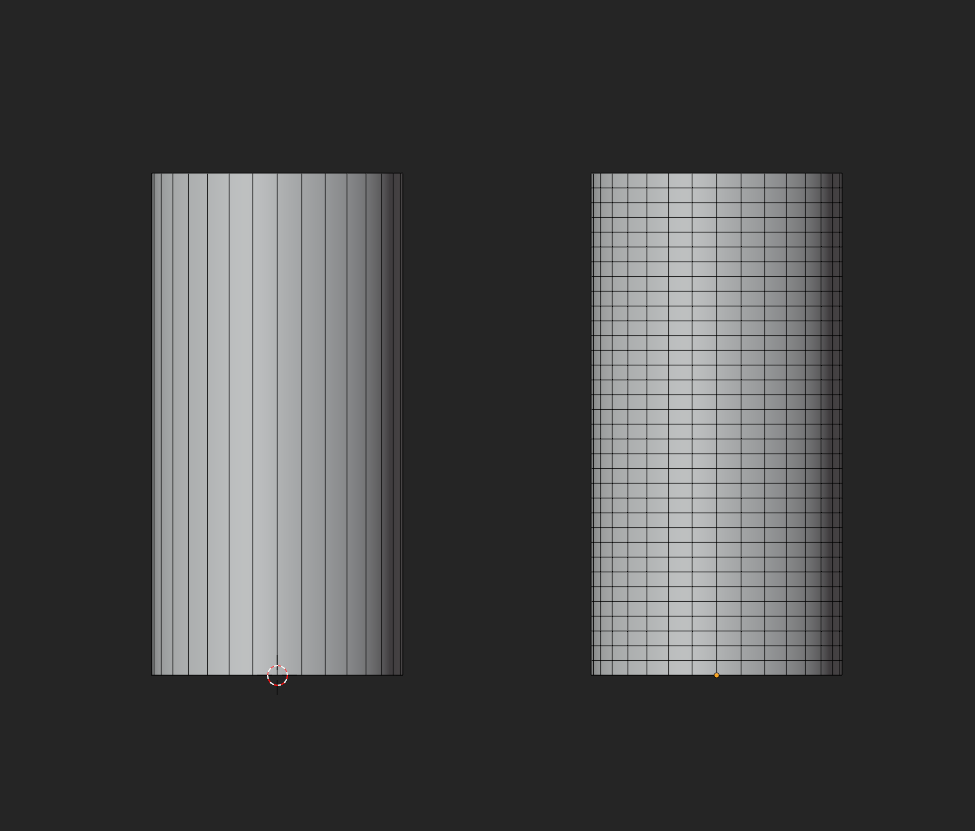
-
Grid-Aligned Sizing: Use predictable unit lengths such as 32, 64, 128, or 192 units. These values keep the length and selection criteria calculations direct.
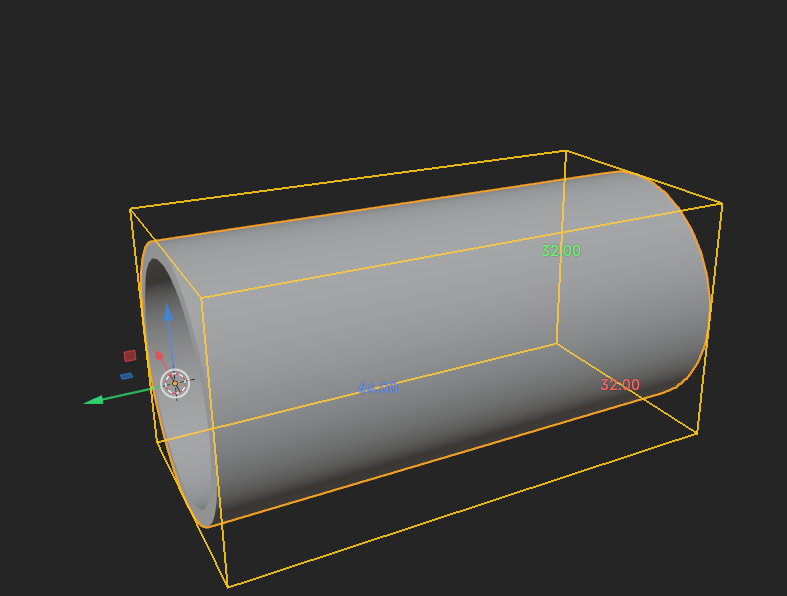
Consistent Alignment Axis
Align all pipe meshes along the same primary axis (for example, Z-up) with matching cross-sectional diameters.
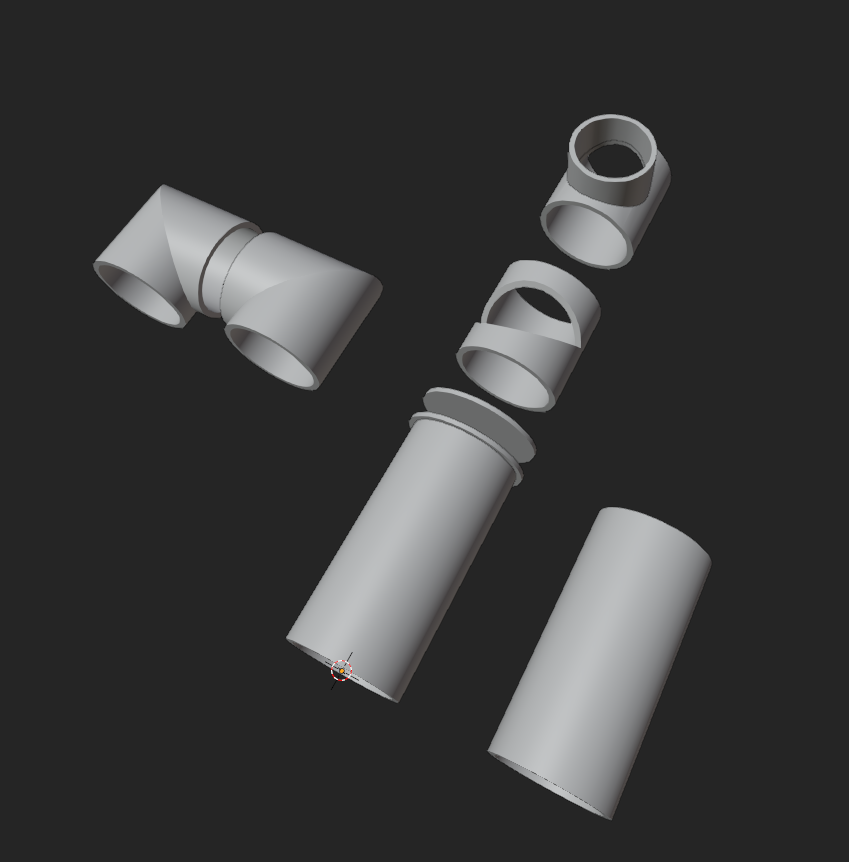
This tutorial uses a custom modular pipe kit built in Blender:
Prepare the models
Each pipe piece has to exist as a compiled .vmdl before a SmartProp can place it.
- Place the unpacked FBX files in the addon's content directory, such as
content/csgo_addons/<addon>/models/pipe_kit/. - Create a
.vmdlfor each mesh. - Compile the models in the Counter-Strike 2 tools.
Configuring each .vmdl by hand is slow for a kit this size.
 Hammer 5 Tools batch-generates and synchronizes the whole set from one reference
asset, see AssetGroup Maker.
Hammer 5 Tools batch-generates and synchronizes the whole set from one reference
asset, see AssetGroup Maker.
Set up FitOnLine
FitOnLine places child elements sequentially along a line vector according to each child's LinearLength selection criteria.
-
Create a new SmartProp document and save it (e.g.,
models/pipe_kit/guide_fitonline.vsmart). -
Import all
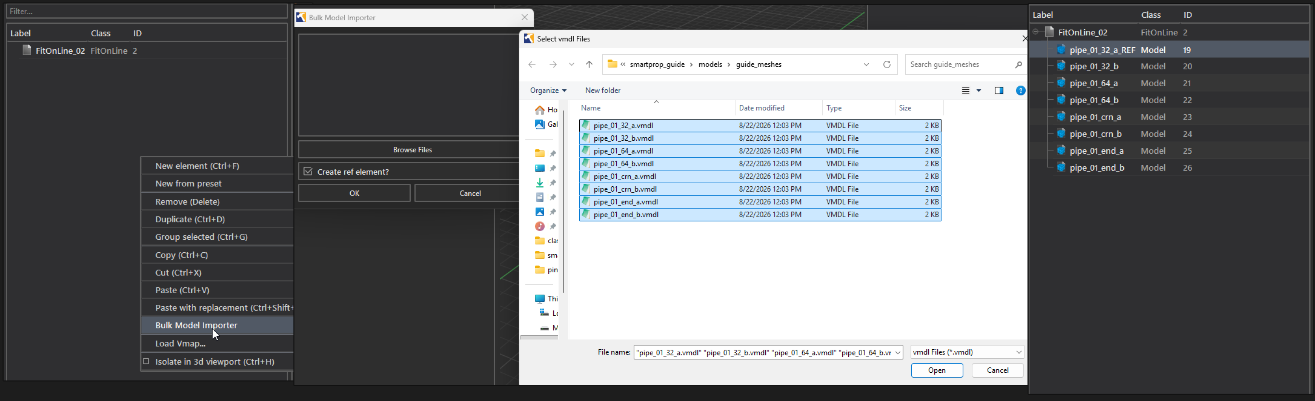
.vmdlfiles into the SmartProp hierarchy.Hammer 5 Tools has a Bulk Model Importer for this:- Right-click in the Hierarchy window and select Bulk Model Importer.
- Select all the pipe
.vmdlfiles. - Check Create ref element and click OK.
-
Move all models except
pipe_01_64_ainto a temporary group and disable that group to focus on the base piece: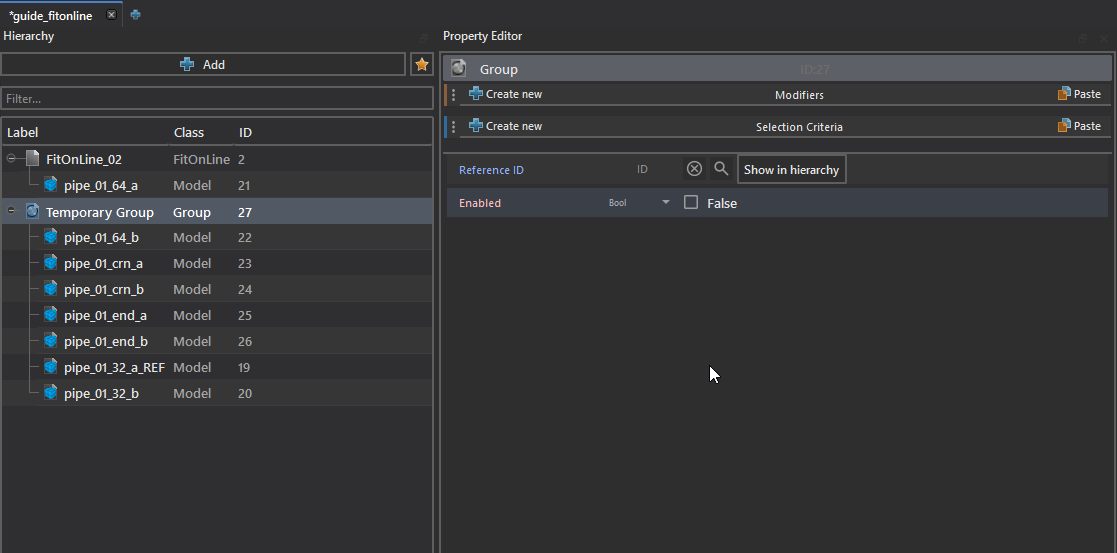
Configure length and selection criteria
-
In the root
FitOnLineelement, set the End coordinate to(0, 0, 128). -
On the
pipe_01_64_amodel element, add a Selection Criteria: LinearLength modifier and set Length to64.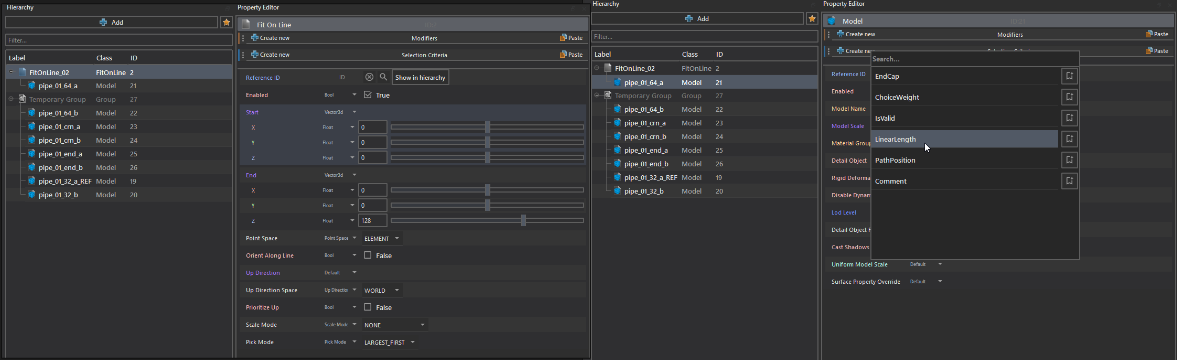
-
Place the SmartProp in Hammer to test it. Because the
FitOnLinelength is 128 and each pipe segment is 64, exactly 2 segments are placed: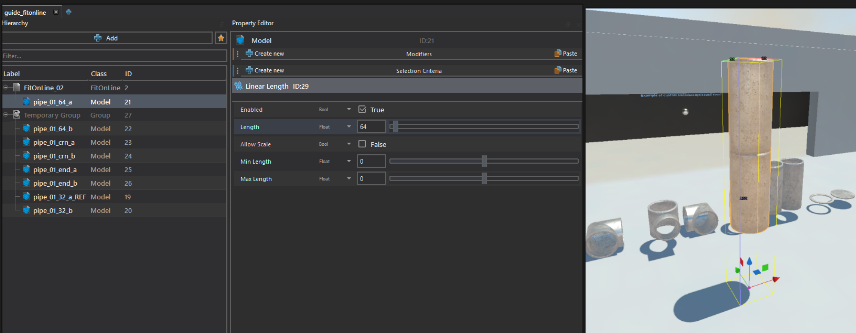
Add an interactive sizer handle (CreateSizer)
- Create a new Group element and attach a CreateSizer modifier to it.
Modifier Grouping Best Practice
Placing
CreateSizerin an empty parent group keeps the hierarchy clean and prevents sizer transforms from unexpectedly shifting the local coordinate origin of the childFitOnLineelement.
-
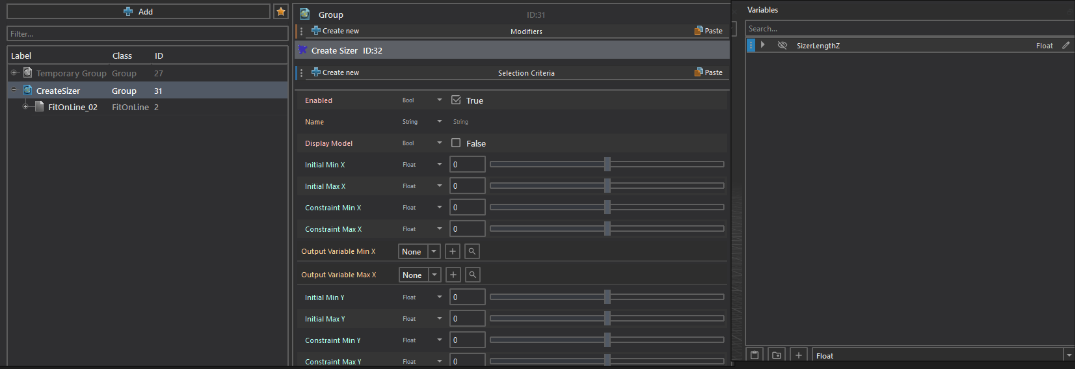
Create a float variable named
SizerLengthZ(uncheck Show in editor). -
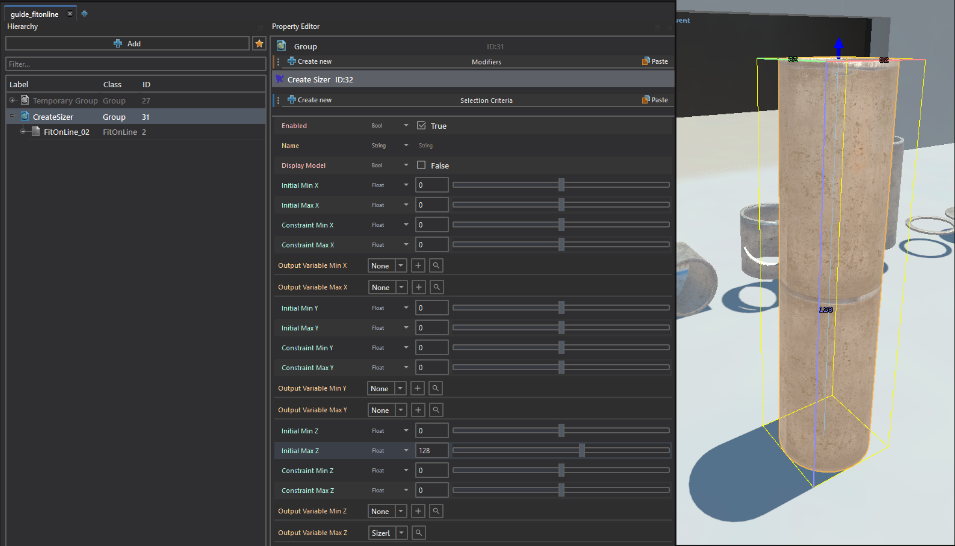
In the CreateSizer modifier:
- Set Output Variable Max Z to
SizerLengthZ. - Set Initial Min Z to
0and Initial Max Z to128. - Set Constraint Min Z to
0and Constraint Max Z to512.
- Set Output Variable Max Z to
Setting Sizer Constraints
Always configure Constraint Min Z and Constraint Max Z on the
CreateSizermodifier to prevent accidental inversion or excessive stretching.
-
In the
FitOnLineelement, change the End.Z property from constant128to theSizerLengthZvariable. -
In the Hammer viewport (
Shift + S), drag the sizer arrow handle to dynamically lengthen the pipe: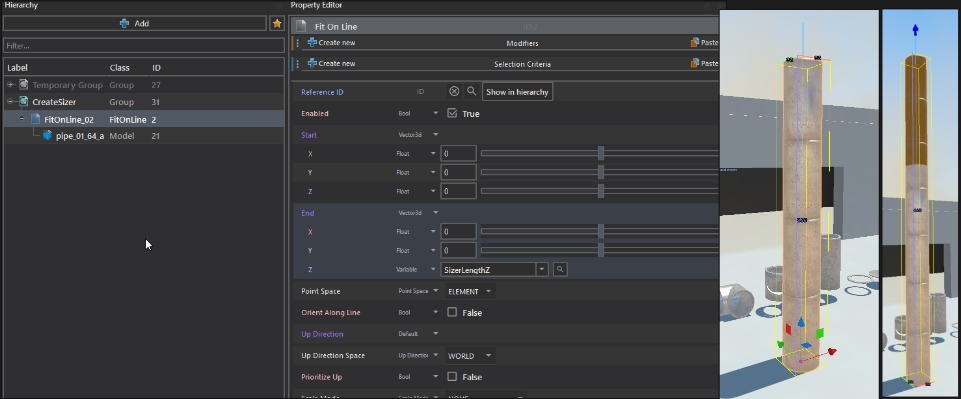
Smooth scaling and material UV compensation
To prevent stepped gaps between fixed-size meshes, enable dynamic scaling:
- In the
FitOnLineelement, set Scale Mode toSCALE_END_TO_FIT(orSCALE_MAXIMIZE). - Select the model element, switch its Model Scale (Z) field to Expression, and enter:
LinearScale()
What does LinearScale() do?
The
LinearScale()expression returns the scale multiplier used byFitOnLineto fill the remaining span. Reference it to offset child caps or connectors by the scaled dimensions.
-
In the model's Selection Criteria: LinearLength, set Allow Scale to
true, Min Length to64, and Max Length to192.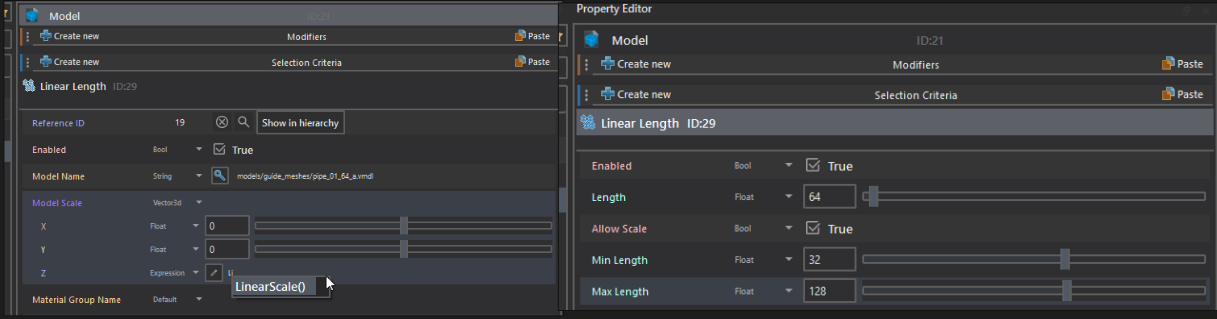
-
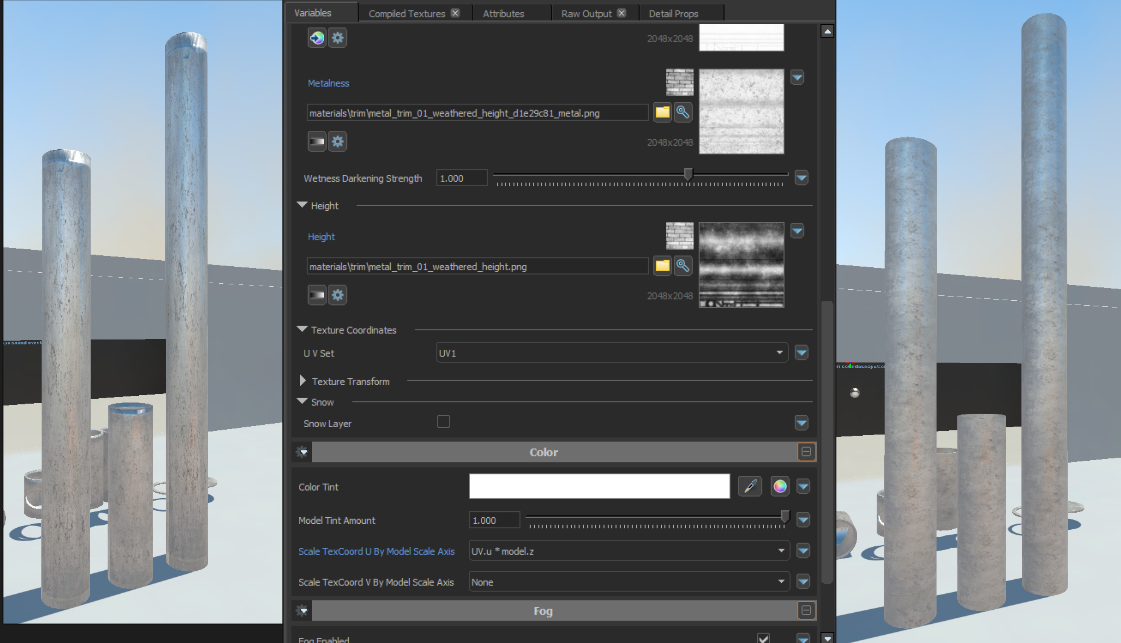
To prevent stretched textures when scaling pipes, enable UV scaling in the Source 2 material (
.vmat):- In Material Editor, enable Scale TexCoord U By Model Scale Axis and set it to
UV.u * model.z.
- In Material Editor, enable Scale TexCoord U By Model Scale Axis and set it to
-
Adding End Caps:
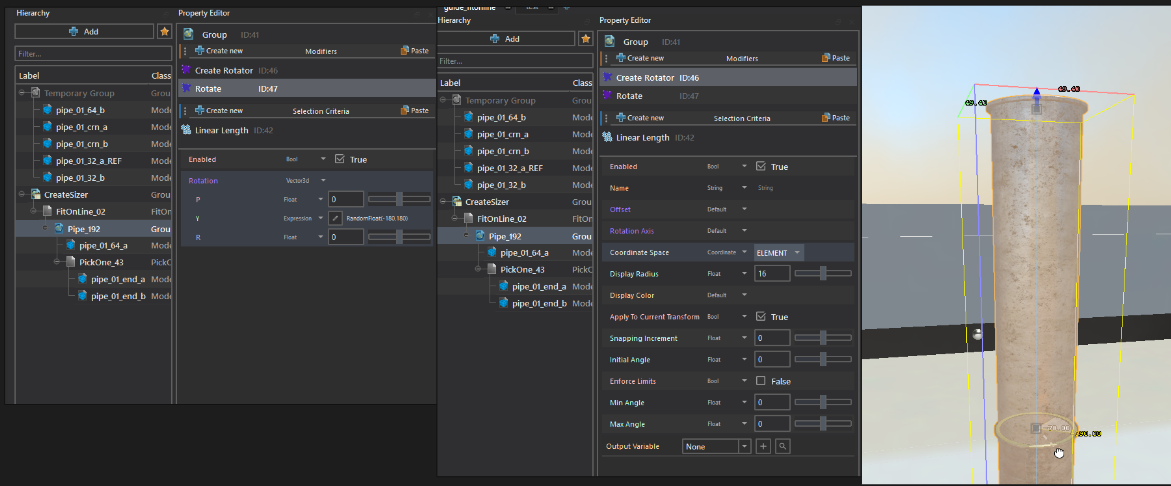
- Wrap the pipe model in a group (
Ctrl + G) and move theLinearLengthcriteria to the group. - Add a
PickOneelement containing cap models (end_a,end_b) set to selection modeFIRST. - Add a Translate modifier to the cap group with Translate.Z set to
LinearScale() * 64.
- Wrap the pipe model in a group (
Branch with nested SmartProps
To allow pipes to branch and change direction, nest the SmartProp inside itself.
-
Create a
PickOneelement named End. -
Place the Cap
PickOneand connector meshes (pipe_01_32_a,pipe_01_32_b) under End. -
Move the translation and a
CreateRotatormodifier to the EndPickOneelement.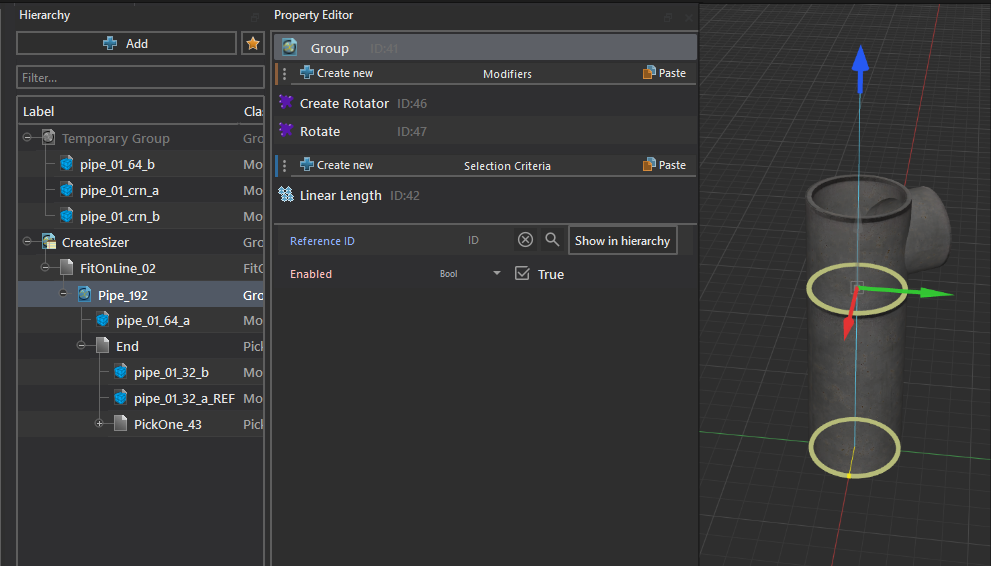
-
Self-Referencing SmartProp:
- Add a
SmartPropelement under the EndPickOne. - Set its SmartProp path to the current
.vsmartfile itself.
- Add a
Preventing Infinite Recursion
When creating self-referencing SmartProps, always set the parent
PickOneselection mode toFIRSTand ensure a non-recursive terminator (like a closed cap) is the first item. Setting the selection mode toRANDOMwill cause the SmartProp to spawn endless recursive copies upon placement, causing the editor to freeze.
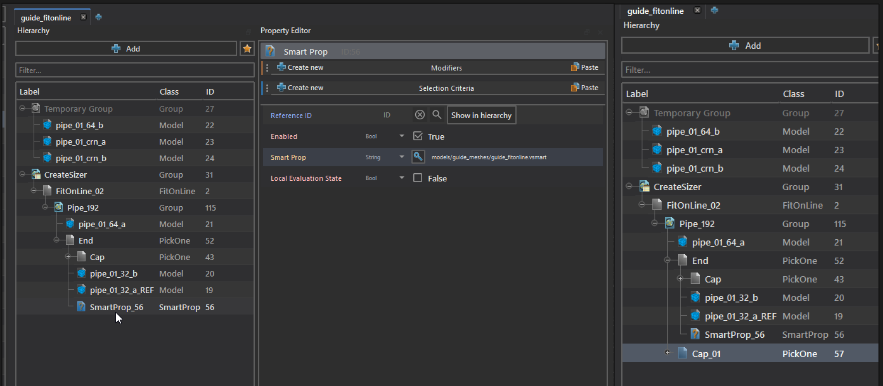
-
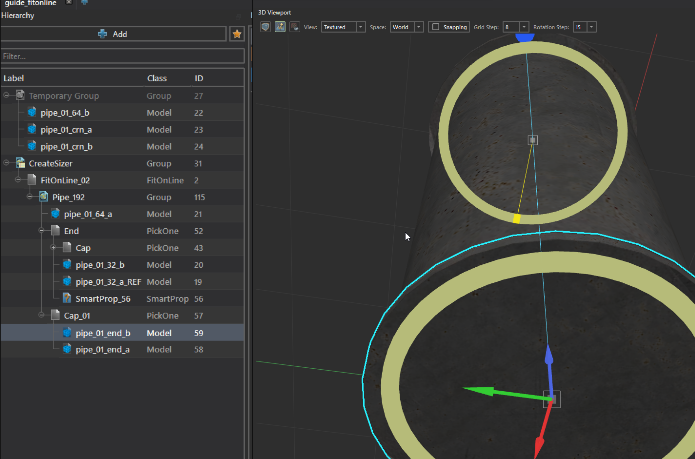
Customize handle shapes, colors, and offset positions for the PickOne widgets:
-
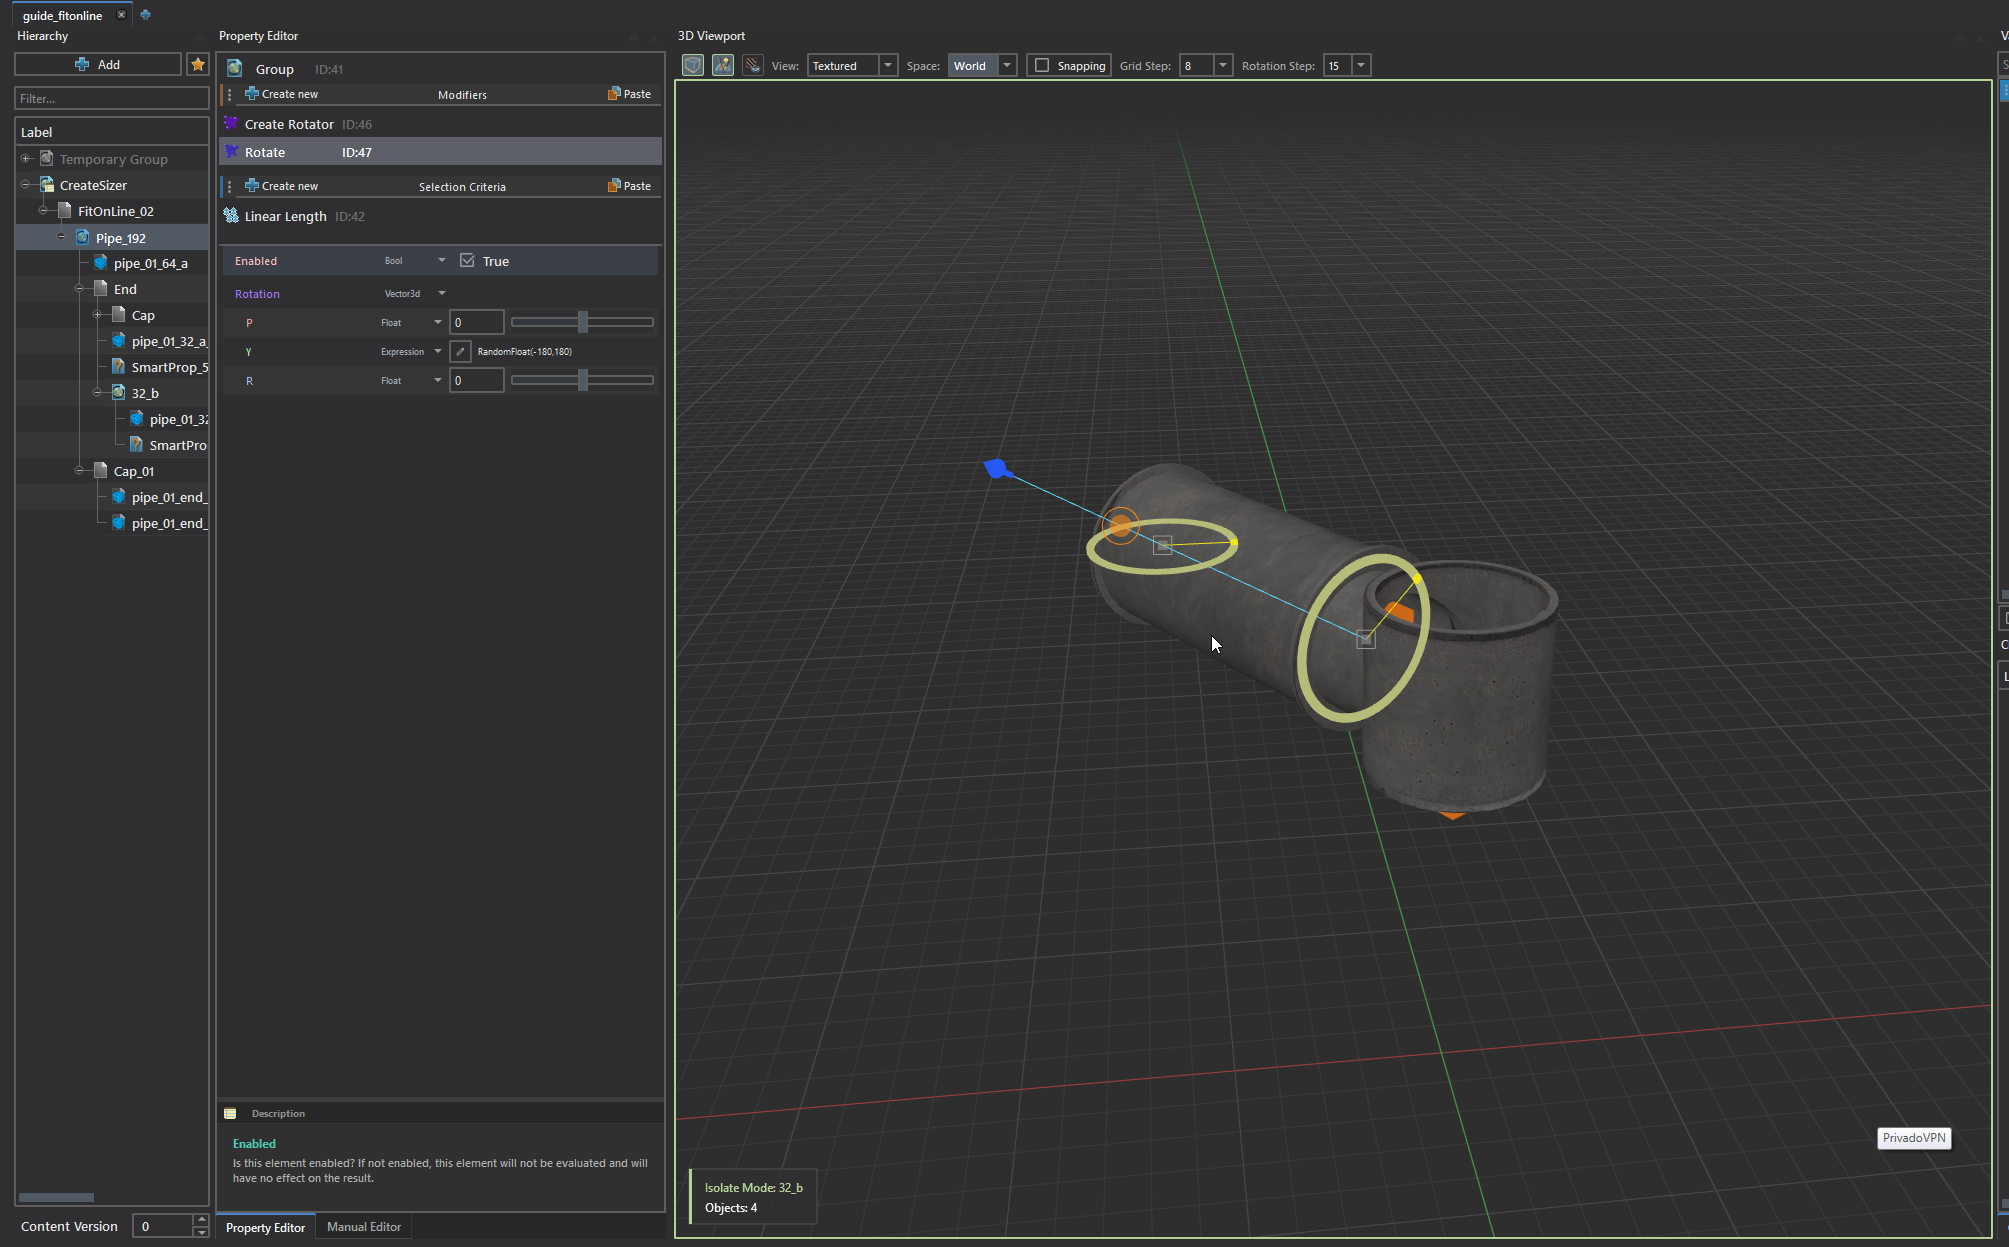
Configuring Branch Connectors:
- Create a group for
pipe_01_32_b(call it32_b). - Duplicate the
SmartPropreference element into the32_bgroup. - Use viewport isolation (
Ctrl + H) to precisely position and rotate the nested SmartProp handle to align with the branch outlet of the connector mesh.
- Create a group for
-
Repeat the same setup for 90-degree corner connectors (
pipe_01_crn_aandpipe_01_crn_b):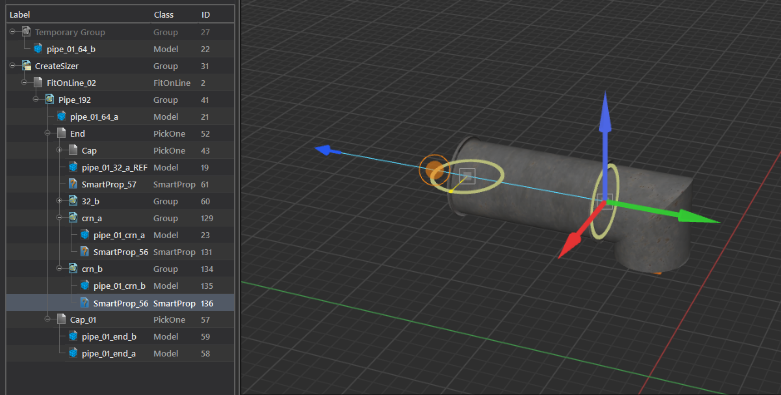
Create curved pipes with BendDeformer
This section introduces the BendDeformer element for smooth curved bends in Hammer.
-
Duplicate the
FitOnLinestructure and place it in a new group named Bend. -
Wrap the model in a BendDeformer element inside the
Bendgroup. -
Attach a CreateRotator modifier to the
Bendgroup:- Set Apply To Current Transform to
false. - Set Coordinate Space to
Element. - Set Rotation Axis to
(1, 0, 0). - Create a float variable named
BendAngleand bind it to Output Variable. - Enable Enforce Limits with Min Angle = -90° and Max Angle = 90°.
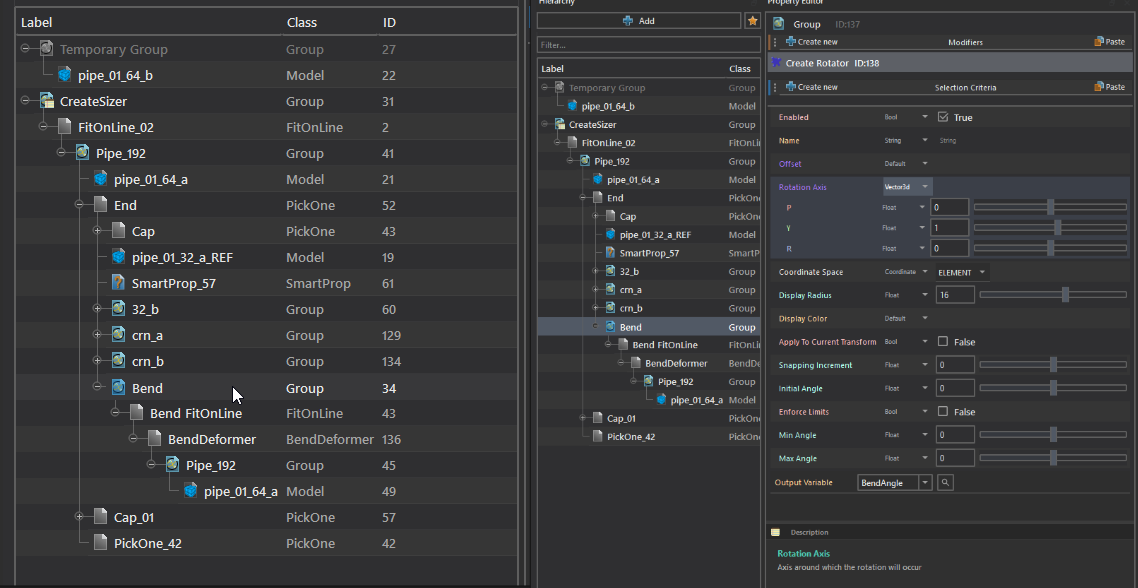
- Set Apply To Current Transform to
Enforcing Angle Limits
Always check Enforce Limits on the
CreateRotator(Min = -90°,Max = 90°) to prevent accidental, non-physical inversions.
-
Reorganize and clean up the hierarchy:
- Move the main picker and sizer handles to the top level.
- Ensure sizer constraints on Z are properly bounded (e.g.
Constraint Max Z = 192).
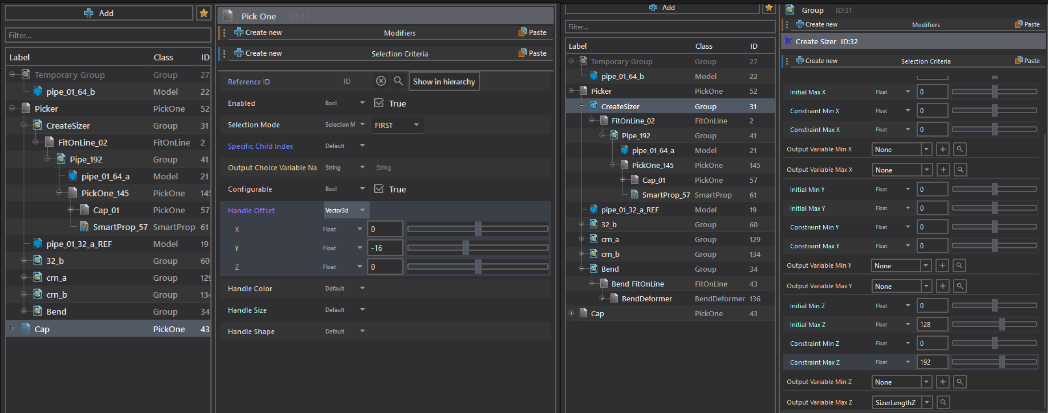
-
Configuring BendDeformer:
- In Bend Angle, bind the
BendAnglevariable. - In Angles, set
(-90, 0, 0). - Set Size.X to
SizerLengthZ(with Y and Z set to0). - Set Bend Radius to
SizerLengthZwhen the bend radius should follow the current pipe length.
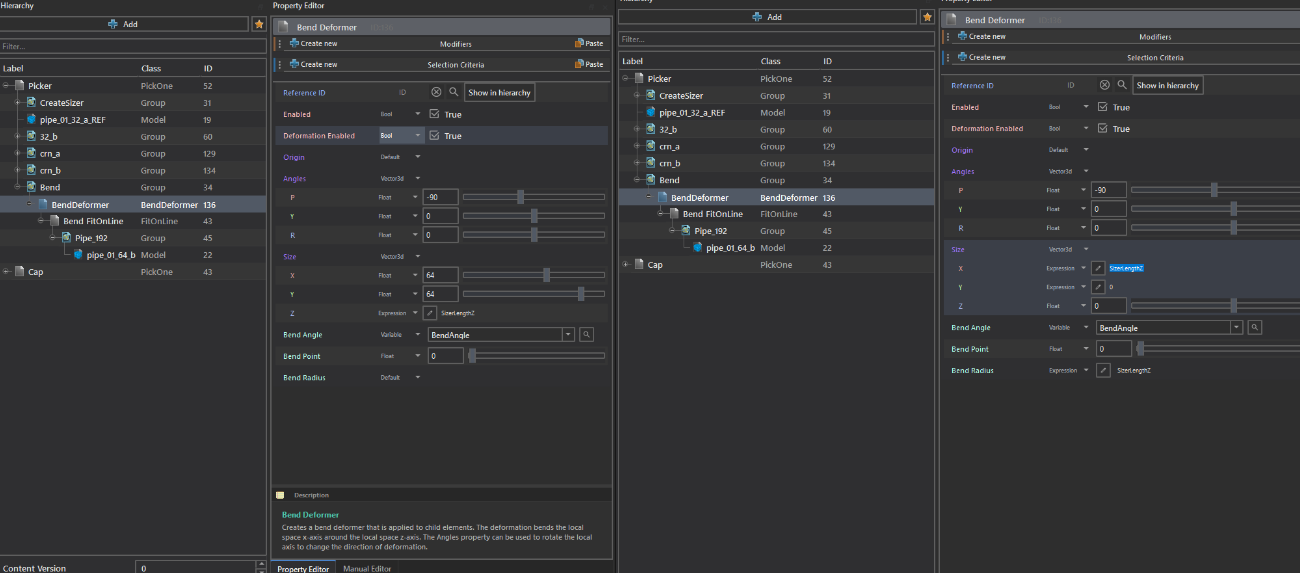
- In Bend Angle, bind the
Rigid deformation modifier
Why is Rigid Deformation required?
When child elements (such as
PickOnehandles or nested SmartProp instances) sit inside aBendDeformer, the deformation skews their interactive viewport widgets and the widgets stop appearing in the viewport.Attach a
Rigid Deformationmodifier to each control group. It exempts that group from the deformation, so its viewport widgets keep working while the mesh geometry underneath still curves.
Final result and workflow recap
The result is a procedural pipe SmartProp ready for testing in Hammer.